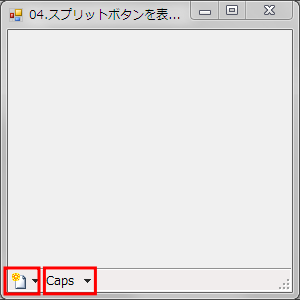
StatusStripにスプリットボタンを表示するには、ToolStripSplitButtonを使用します。
ToolStripSplitButtonにはTextプロパティを使用すればテキストを、Imageプロパティを使用すればイメージを表示することができます。
またDropDownItemsプロパティのAddメソッドを使用して項目を追加すれば、ドロップダウンボタンとしても使用可能です。
下記は、スプリットボタンを使用する例です。
「新規」を表すイメージを表示したボタンと、”Caps”と書かれたボタンの2つのスプリットボタンを追加しています。
VBの例
' フォームロード時の処理
Private Sub Form4_Load(sender As System.Object, e As System.EventArgs) Handles MyBase.Load
    Dim capsButton As New ToolStripSplitButton
    Dim newButton As New ToolStripSplitButton

    '[新規]ボタンの作成
    newButton.ImageTransparentColor = Color.Black
    newButton.Image = Image.FromFile("C:\Work\NewDocumentHS.bmp")

    '[Caps]ボタンの作成
    capsButton.Text = "Caps"

    'StatusStripに[新規]ボタンと[Caps]ボタンを追加
    StatusStrip1.Items.Add(newButton)
    StatusStrip1.Items.Add(capsButton)
End Sub
C#の例
// フォームロード時の処理
private void Form4_Load(object sender, EventArgs e)
{
    ToolStripSplitButton capsButton = new ToolStripSplitButton();
    ToolStripSplitButton newButton = new ToolStripSplitButton();

    // [新規]ボタンの作成
    newButton.ImageTransparentColor = Color.Black;
    newButton.Image = Image.FromFile(@"C:\Work\NewDocumentHS.bmp");

    // [Caps]ボタンの作成
    capsButton.Text = "Caps";

    // StatusStripに[新規]ボタンと[Caps]ボタンを追加
    statusStrip1.Items.Add(newButton);
    statusStrip1.Items.Add(capsButton);
}
Please follow and like us:


コメント