
本記事の概要
この記事では、WPF の Calendar で選択されている複数の日付を取得または設定する方法について説明します。前回の記事では単一の日付の取得または設定する方法について説明しています。
公式サイト情報はコチラ を参照してください。
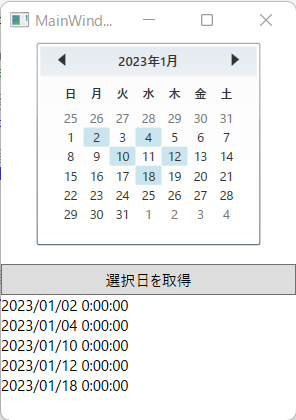
実行例
現在選択されている複数の日付を取得または設定するには?
WPF の Calendar で、現在選択されている複数の日付を取得または設定するには、SelectedDates プロパティを使用します。
ただし、複数の日付を選択できるようにするには、SelectionMode プロパティの値も変更する必要があります。
SelectionMode プロパティには、以下に示す CalendarSelectionMode 列挙体の値を指定します。
| 値 | 説明 |
| SingleDate | 単一の日付を選択できるようにします |
| SingleRange | 1つの日付範囲を選択できるようにします |
| MultipleRange | 隣接していない複数の日付を選択できるようにします |
| None | 日付の選択そのものを許可しない |
以下は、「選択日を取得」ボタンをクリックすると、現在選択されている全ての日付を取得して TextBlock に表示します。
XAMLの例
<Window x:Class="WpfSample.MainWindow"
        xmlns="http://schemas.microsoft.com/winfx/2006/xaml/presentation"
        xmlns:x="http://schemas.microsoft.com/winfx/2006/xaml"
        xmlns:d="http://schemas.microsoft.com/expression/blend/2008"
        xmlns:mc="http://schemas.openxmlformats.org/markup-compatibility/2006"
        xmlns:local="clr-namespace:WpfSample"
        mc:Ignorable="d"
        Title="MainWindow" Height="300" Width="250">
    <Grid>
        <Grid.RowDefinitions>
            <RowDefinition/>
            <RowDefinition Height="25" />
            <RowDefinition Height="25" />
        </Grid.RowDefinitions>

        <Calendar x:Name="myCalendar" Grid.Row="0" />
        <Button Content="選択日を取得" Click="btnGetSelectedDate_Click" Grid.Row="1"/>
        <TextBlock x:Name="txbStatus" Grid.Row="2" />
    </Grid>
</Window>
C# の例
private void btnGetSelectedDate_Click(object sender, RoutedEventArgs e)
{
    txbStatus.Text = "";

    foreach(var selectedDate in myCalendar.SelectedDates)
    {
        txbStatus.Text += selectedDate.ToString() + Environment.NewLine;
    }
}
実行例
Please follow and like us:

コメント