
RadioButtonコントロールは、ページ上に配置した時点で1つのグループに属することになります。
このため、選択肢A用のRadioButtonグループ、選択肢B用のRadioButtonグループを作るには、何かしらのコンテナコントロールの上に配置する必用があります。
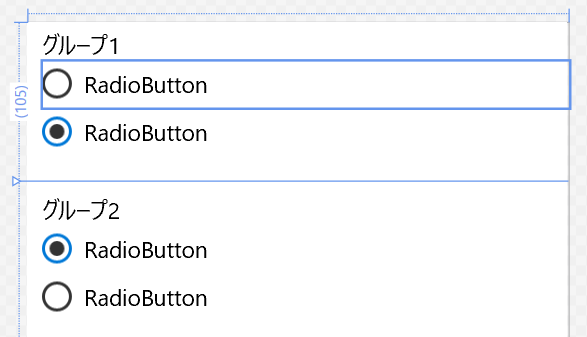
今回はMainPage.xaml上にStackPanelを2つ配置して、RadioButtonのグループを2つ作成してみます。
上記のXamlを以下に示します。
<Page
    x:Class="App1.MainPage"
    xmlns="http://schemas.microsoft.com/winfx/2006/xaml/presentation"
    xmlns:x="http://schemas.microsoft.com/winfx/2006/xaml"
    xmlns:local="using:App1"
    xmlns:d="http://schemas.microsoft.com/expression/blend/2008"
    xmlns:mc="http://schemas.openxmlformats.org/markup-compatibility/2006"
    mc:Ignorable="d">

    <Grid Background="{ThemeResource ApplicationPageBackgroundThemeBrush}">
        <Grid.RowDefinitions>
            <RowDefinition Height="Auto" />
            <RowDefinition />
        </Grid.RowDefinitions>

        <StackPanel Grid.Row="0" Height="100" Margin="10,5,0,0">
            <TextBlock Text="グループ1" />
            <RadioButton x:Name="radioButton1" Content="RadioButton" HorizontalAlignment="Stretch"
                         VerticalAlignment="Stretch"/>
            <RadioButton x:Name="radioButton2" Content="RadioButton"
                         HorizontalAlignment="Stretch" VerticalAlignment="Stretch"
                         IsChecked="True"/>
        </StackPanel>
        <StackPanel Grid.Row="1" Margin="10,10,10,201">
            <TextBlock Text="グループ2" />
            <RadioButton x:Name="radioButton3" Content="RadioButton" HorizontalAlignment="Stretch"
                         VerticalAlignment="Stretch"
                         IsChecked="True"/>
            <RadioButton x:Name="radioButton4" Content="RadioButton"
                         HorizontalAlignment="Stretch" VerticalAlignment="Stretch"
                         />
        </StackPanel>
    </Grid>
</Page>
Xamlを詳しく見てみましょう。
まず、MainPage.xamlに配置されているGridに行を2つ作成しています。
続いて、それぞれの行にStackPaneを配置し、StackPanelにはTextBlock1つとRadioButtonを2つずつ配置しています。
これで、RadioButtonのグループが2つできたことになります。
このように、1つのページ上でRadioButtonのグループを複数作成するには、コンテナコントロールを使用します。
Please follow and like us:

コメント